Showing posts with label sculpture. Show all posts

Saturday, April 2, 2016

Ice Cream Paper Mache' Sculptures

Time flies when your life completely flips upside down...my old lap top died with the switch to windows 10 and I left an elementary position this past summer to move up to a middle school teaching position in the same school system. I have taught 6th - 8th grade students since August.
My view so far is that the kids are the same from kindergarten through 8th grade, only the heights change and the vocabulary expands a bit.

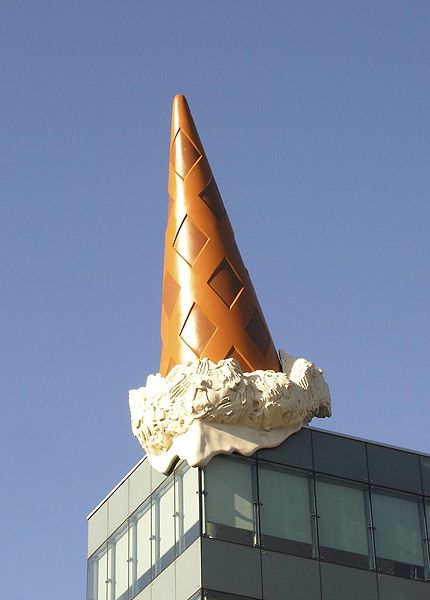
This week my students viewed the works of Claes Oldenburg. He was our inspiration for pizza sculptures and ice cream sculptures. 


My favorite image to refer to was this one:


Wednesday, May 23, 2012

End of the Year Box Monsters!

Tomorrow is our last student day. Then the teachers get what I'm referring to as a 'quiet day' to pack up the classroom. Its chaotic, but we are having so much fun.
I did get around to creating box monsters with my fifth graders and it was definitely an experience. I want to do this again next year.


I set up each table with the following: one kleenex box per student, scissors, glue-all, markers in varying colors, plastic cups and lids, tagboard (we use tv dinner box cardboard), and foam shapes.

I start off by explaining that the opening of the box will be the mouth and we will be adding eyes, teeth, and details with other materials. We began by tracing or drawing circular eyes on the tagboard. They can make as many eyes as they chose to. Then color with markers to create pupils. Cut out and glue above the opening of the box.


Then we take a second piece of tagboard and cut it into a long slender rectangle. Cut down the middle of the rectangle with a zig zag line to create the teeth. Teeth are glued to the top and bottom of the box opening from the inside. Use glue-all... holds so much better and more permanently than school glue.


Then I tell students they may use the foam shapes to create noses, eye lashes, warts, etc for their monster. Oh they had the best time!


Some students even used scrap tagboard to create arms or legs hanging off the edges of the box. Hilarious!

A pointer for this project: Start collecting early. I recommend the beginning of the school year. I wouldn't have stressed near as much the last couple of months if I hadn't waited until December to start asking.


Sunday, April 29, 2012

Please Don't Eat the Art

See those right there?  See 'em? What do they look like to you? Popcorn? White cheese puffs?


Well they are all natural. They are made of cornstarch, but I wouldn't put one near my mouth. These splendid little objects are the new bio-degradable packing p-nuts found in all sorts of packages. I have been collecting them for about two years and finally reached a large enough quantity that we are ready to do some sculpture. (Teachers have donated the majority from many science packages shipped to the school)

I start off students with a paper base. We use a circle, however you can likely use any shape you want.

I used this specific size because I didn't want them to work too small.


Cut them out and don't forget to write your name on the back!


Now how do you make sculptures? We moisten each p-nut on a damp sponge. The material melts a wee bit and becomes sticky.


Then press the sticky end onto the base. Repeat this process and begin to stack p-nuts on top of each other. They can be stacked horizontally, vertically, and even diagonally.


I let students use about 20 of these p-nuts and build however they would like to. Some sculptures are tall, short, round, curly, etc. Each one is unique. I also have them choose their 20 before I show them how to stick them together so they don't later lose count.


After their construction, I encourage them to use vibrant color markers to eliminate as much white as possible.


I've seen materials like this in catalogs, but they can cost A LOT.  I was able to get all these free by simply asking people to keep an eye out for those particular packing materials.

I love these because you can make all sorts of connections: recycling, architecture, abstraction, etc. So many options. Clean up is minimal, assembly is easy for any age level, and if someone tries to toss one it isn't going very far.

This project takes about 1 forty minute class and can be loads of fun for that rather wild end of the year.

Sunday, April 15, 2012

Poppin' Fish!

We are officially on Spring Break! So I finally have some time to update on a few little things we have been up to.This is a nifty little project that I learned at a state conference several years ago. Alicia, a very talented art teacher in my state shared this project and it has become a staple for me quite regularly for 2nd - 5th grade level students.


First I have my younger students trace a simple fish template, however my older students usually feel more confident so I have them hand draw out a fish shape. Then they draw an eye and lips if they would like to. Also, students are to draw a "fin" in the corner using any kind of line they would like...straight, curving, wiggly, etc. 
Then the fun part... adding patterns. Students draw patterns using markers and/or crayons to fill their entire fish.


The next class we first finish our patterns and make sure we don't forget to color our fin in the corner too!  Students then cut out the fish and the fin. I help the younger ones with this next step.


Students cut a curving line into the fish body to create a "gill". We need it to curve away from the mouth.


Then take the front half of the cut body and slide it over the back to overlap. This "pops" out the body. I will staple for the younger kids, however older ones can glue with a dot. Then the fin receives a dot of glue and is slid into this Popped gill to dry.


Lastly students glue the fish onto a piece of 9 x 12" construction paper in whatever color they would like. We just put a dot of glue on the dorsal fin, mouth, and tail. No need for it anywhere else. They can use crayons and markers to create an environment around their fish. As you can see my students can come up with some really awesome patterns. These examples are created by 3rd grade students.


I love this project. Simple 3-d and my students are always so proud of their works. Because of storage space, students nearly always take this project home on the second week after completion. This was a fun way to begin our break.


This project took 2 forty minute classes to complete. Our materials were the following:
1. 9 x 12" white drawing paper
2. 9 x 12" color construction paper
3. Markers
4. Crayons
5. Scissors
6. Glue
7. Pencils and erasers
8. Templates (if you so choose to)


Monday, April 9, 2012

Something Fishy Going on Around Here

The past two weeks my primary kids have been working on Ocean themed projects. There's a PTO program coming up and the halls are taking on a very nautical theme.

Last week kindergartners created Jellyfish sculptures. These were a huge hit! I know some people regard paper plates as a poor means of sculpture, but when I have zero dollars to spend on supplies and over 100 kids sometimes the paper plate is my best option. I try to do the most with what I have to work with. Besides, isn't this the prettiest little paper plate you have ever seen?

Students were asked to draw patterns with crayons onto the plate.
Next students glued long strings of tissue paper (purples, pinks, and whites) onto the straight edge of the plate. Students could even draw patterns onto the tissue paper tentacles. K students LOVE these! Especially the sound they make when we swam them back to the classroom.

This project took 1 forty minute class.
1 half paper plate, tissue paper in various colors cut into strips, crayons, and school glue.
One point I want to mention in regards to this project is the fact ALL my kindergarteners wanted to "Buzz" their jellyfish. I've discovered SpongeBob has lead our students astray into thinking jellyfish do in fact buzz. <insert a huge sigh here>

Then this week we have made Watercolor Resist seascapes!
We first drew the sand and seaweed together. But the rest was up to them. I had several posters of fish, whales, dophins, etc displayed on the board for reference. Students were allowed to draw any real sea creature or people who could also visit the ocean. Sunken ships and treasure were also options.


Look at the mer-couple! Even the crabs are holding hands. This is so cute!  When this child asked me "Can I draw a mermaid?" I asked her if that was a 'real' sea animal. She responded with "I believe in them." So I agreed to it. So glad I did!


Very alert crab!

(Love the Bermuda pink sand!)

Love when the page is filled!

Also the book fair is here this week, yay! These fantastic books made their way into my arms. I'm so excited about them.
Pete the Cat by Eric Litwin
You are My Work of Art by Sue DiCicco
Baby Bear Saw Blue by Ashley Wolff
Leap Back Home to Me by Lauren Thompson


Spring break is next week... finally.

Thursday, March 8, 2012

Falling off the face of the earth...

I think I've overwhelmed myself...


I have a few too many projects going on at one time. Besides our collage color wheel I have students in my studio classes finishing their paper mache' birds, creating art work for the library, creating frames for said artwork, and creatinga recycle robot. This doesn't even include the bagillion other projects I have going on with all my regular classes.

This is "Tech-o" the robot. His body is constructed from shoeboxes, discarded cardboard boxes, gift wrap cardboard tubes, and lids/bottlecaps/yogurt cups to create the head details. He is about 90% done.


I think I need to slow it down. I'm so overwhelmed I can't even find time to blog about our regular school projects. And we have some nifty ones at the moment. I'll get to it eventually... time time time.

On an entirely different note, I cannot praise enough the amazing experience my 27 students had at the Montgomery Museum of Fine Arts last month. Its truly wonderful! The staff was prepared for our visit and well versed in the material we learned about. My students had a great time and I look forward to visiting them again!!!

Thursday, January 26, 2012

Ndebele Hut Sculptures!

I have spent the last three weeks with my 4th graders discussing a culture of people from south east Africa known as the Ndebele. (En-duh-bay-lay) These are a very creative group of people who are also very traditional and continue the practice of building homes with beautiful geometric designs.

We started off with a piece of 6 x 18" long drawing paper. Students were given the option of choosing a shape for the door to be drawn in the middle of the paper. From there, students were to draw geometric shapes to create designs on each side of the door. The rule was that I wanted it to be symmetrical. Each side needed to match closely. We traced our designs with permanent marker.

The second day we worked on this project students finished tracing their designs with marker, then colored with crayola markers. This project could be colored with crayons or even painted with watercolors or tempera. Its whatever you feel most comfortable doing.


The third day students completed coloring and we began turning our flat paper into a cylindrical sculpture. Students rolled their houses into a cylinder and glued the two ends together.  Then they traced a large circle onto a 9 x 9" piece of brown construction paper. They cut the circle out then cut a radius into it.


Students brought me their roof circle and cylinder house. I stapled the roof into a wide cone, then hot glued the roof to the cylinder. You could have students do these independently, however I felt this would complete the project most efficiently if I helped them along.


These all turned out differently and I love the results!  Our school librarian has graciously allowed us to display our huts in the library. They are quite the hit!


There is also a good story book out there called the Village of Round and Square Houses by Ann Grifalconi that makes a great reference for this particular project. Feel free to google Ndebele. They are a fascinating people!

This project took 3 forty minute classes to complete. Makes a great interdisciplinary connection to geometry, shape, and symmetry in 4th grade math studies.
This project is inspired from a lesson I got at my 2009 state conference.

Sunday, December 18, 2011

A couple of favorites and Monsters

I just wanted to take a moment to sing the praises of two items I love to use in my classroom. Maxwell House and Folgers giant plastic coffee containers are amazing water cups! Some do have handles which make for easy carrying and the sturdiness of each makes spills much less frequent. Also, they can hold a lot of water so I find myself pouring and refilling cups a little less often during the day. 


Secondly, after Easter I found this plastic egg dying tray. This is by far the coolest paint container I've found. Excellent for keeping colors separate, quantity control, and extra space for mixing. I recommend looking after the holidays for this tray. I think I got them for 98 cents each!


This idea I found on pinterest. On pinterest kleenex boxes were the base, but we used Greenies Dog Treat boxes someone donated to my classroom. I cut a rectangular opening for the mouth, then students covered the box with wallpaper to create a fun print. The eyes are discarded cardstock and teeth are from a cut up card windshield visor. This is an entirely recycled project. I did this project with my 4th grade advanced students due to the limited number of boxes. I'm starting to collect kleenex boxes now so hopefully I could do this with an entire grade level in the spring. My students loved these!


If you look closely on the monsters, the lid for the boxes is on the bottom. We did that on purpose so that it could be used for a secret storage box. Notes, toys, etc can be put in the mouth then empty things out by pulling off the lid.

Two more student days until we are out for the holidays. Can't wait!

Tuesday, November 22, 2011

Last Minute Craftiness

I saw classes just one day this week.  I decided to do something special with them since I normally miss Monday classes due to holidays and such. In keeping with our Thanksgiving/fall/harvest theme this week I decided to use the old toilet paper tubes again with my younger students. We made Native American Symbol Drums! Quiet drums I might add. Gosh we just get so crafty sometimes it almost hurts. 


Native American Symbol Drum

This is created by using a 4 1/2 x 6 inch piece of brown construction paper, toilet paper tube, small piece of computer/scrap white paper, construction paper crayons, and glue.

I pre-glued white paper onto each tube (similar to the way we did the soup cans last week) for my kindergarten students. (Make sure this is dry before giving to students). Then I hand each student a drum and their brown paper. They looked at examples of Native American symbols and could draw their own using their crayons onto the brown paper. When they filled the paper, we glued the brown construction paper around each tube and students had to hold it with two hands, like an icecream cone, for a long time so the paper would stick.

When dry I showed students how to play the drum by tapping it with a flat index finger. Out of 37 kids only 3 tore the top by using a pointed finger. That's not too bad of a ratio. The kids loved playing the drum back to their classrooms and luckily the sound of tapping computer paper isn't very loud.

Native American Symbol Medallions

My younger sister is interning right now in a 1st grade classroom and happened to have some left over crayola air dry clay from a project she did. Well I snapped the extra up and used it with my 1st graders at my school. We ended up making Native American Symbol Medallions.

Clay? with 1st graders?  Totally. They are completely capable with the right rules, expectations, and instructions. I had 33 students create their medallions on Monday and they all turned out unique and awesome. I am so proud. We also looked at the same Native American symbols my K students saw, but my students drew with plastic utensils. I first showed them out to roll the clay piece into a ball in their hands, then on the table, then gently press the clay to make a disc. It should be as thick as their pinky fingers otherwise the clay will dry brittle. Several had to ball up and try again until we got it just right.

Then they drew into the clay with their plastic utensils. I love these and the kids were so surprised and thrilled to be part of this special opportunity. I used the end of a paintbrush to poke a hole in each one and strung yard through when they were more solid. 


Now... its time for a break. Woo hoo!

Sunday, November 20, 2011

Completed Soup Cans

Its almost Thanksgiving! Yay!
This will be a short week for us at school, so we will utilize our time finishing other projects. Nothing new planned until after the holiday week. Reindeer, snowmen, pointsettias, and snow are on my mind for the weeks ahead. I can hardly wait.

I have a few pictures of completed student soup cans that I put on display in our school. They turned out so nicely, it was worth all the little challenges along the way.

Delightful Tomato Soup

Mac'n Cheese Soup

Broccoli and Pizza Soup


This year I'm thankful for my job, my home, my family, and the creative little people I work with.
Happy Thanksgiving!

Thursday, November 10, 2011

Pop Art Soup Cans!

My 5th graders have been learning about Pop Art for about 2 months now. This has been a rather lengthy unit, but I think my students are now experts! This last part of our unit focused on Andy Warhol. I wanted to create a sculpture with my students in a time where clay is not something I can afford. So we used entirely recycled materials for this project.

Supplies:
1. Cardboard cylinders (paper towel or toilet paper tubes)
2. Discarded computer paper (1 piece cut 4 1/2 x 6" and small square for lid)
3. Cardboard/cardstock from frozen tv dinner boxes

Then we used scissors, glue, and color markers.

Easy supplies to collect if you can get kids to bring them in


Students were given freedom to choose a design for their soup label. They could invent any type of soup they wanted. I just had two requirements 1. Write the name of the soup in the middle 2. Draw illustrations to give clues to the flavor of the soup.

Students drew design with pencil, traces with black sharpie, then colored with bright colors (bold colors like Warhol).
Doesn't Pizza Soup sound delightful?


We then drew a "pop top" on a small square of computer paper. Colored it also with bright colors. Glued this to one end of the cylinder. Then we added glue to the back of their soup label and wrapped it around the cylinder to cover the rough edges of the lid.


Lastly, we drew an exciting pattern using bright colors onto the box cardboard (blank side). Students glued the bottom of the cylinder onto the "table top" as I called it. We allowed them to dry over night and voila! Recycled sculpture in Pop Art style!

*Pointers - if you have cardboard pieces like cereal boxes that don't have a white side you can always glue more cheap discard paper on it to draw on. *Put that lid paper on first *Remind students to orient their label accordingly with the lid. I had a few upside cans although I told them it gave their soup more personality. *Give yourself drying time before using marker again. *This takes some serious demonstration, be prepared

This project took 3 forty-minute classes to complete.

Wednesday, October 19, 2011

Bugs bugs bugs!

I have a project that I've done for several years with my fourth graders, but for some reason took a break from it the past couple. After puzzling on what project I wanted to do next, a few classroom teachers urged me to create our Symmetrical Insect drawings again. My teachers love it and it usually ties in well with their science studies.
I begin by introducing students to insects with a powerpoint I've created. We talk about "symmetry" and that insects are symmetrical. I tell students to pretend they are an explorer in the rainforest and you have discovered a new insect. What would it look like? I then create rules for this project. (written on the board) 
1. Insects must have three main body parts - head, thorax, abdomen
2. Insects must have 6 legs
3. Insects should have compound eyes and antennas
4. Insects must have original patterns and designs
5. Insects may have details such as wings, stingers, pinchers, etc

The first day students draw their insects with pencil, then trace with black sharpie. I ask students to choose 3 shapes of their choice for each body part. The second day students then begin to color with markers. My father happens to be an entomologist so he can usually scrounge up an insect collection for me to share with my students which they love! (Well mostly, I have some kids that are totally creeped out) Because these drawings are large on 12 x 18" paper it usually takes a third day to complete the coloring.


I also have fifth grade advanced students working on paper mache' birds. I think we are off to a great start!


This is an excellent recycling project. We are using two-liter bottles as our base. The head is formed from newspaper, then covered in aluminum foil. The beak is also aluminum foil hot-glued to the head. Lastly our wings are made from scrap posterboard. I am so eager to see them in paper mache'.