Saturday, April 2, 2016

Ice Cream Paper Mache' Sculptures

Time flies when your life completely flips upside down...my old lap top died with the switch to windows 10 and I left an elementary position this past summer to move up to a middle school teaching position in the same school system. I have taught 6th - 8th grade students since August.
My view so far is that the kids are the same from kindergarten through 8th grade, only the heights change and the vocabulary expands a bit.

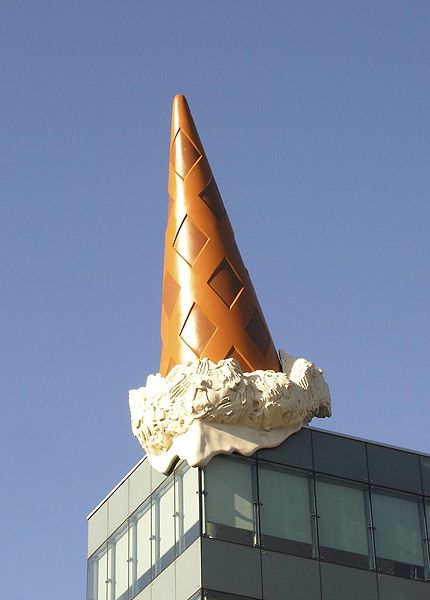
This week my students viewed the works of Claes Oldenburg. He was our inspiration for pizza sculptures and ice cream sculptures. 


My favorite image to refer to was this one:


Wednesday, June 10, 2015

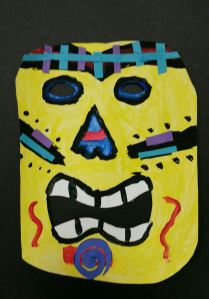
Primary Color Tiki Tiki Masks

The longer I teach the more interested I become in the process of mask making. Each group of students has a different view of what the purpose of a mask can be. Halloween is always a really good reason for masks, but by the time they reach 5th grade they can give me some more well thought out answers for example "Expressing one's emotions" or "Hiding identities". 
African masks are a very popular subject matter, but I wanted to try to vary up the style a bit. This project studied Polynesian/Hawaiian style Tiki Masks. 
37994823
Rage Tiki.
Primary Tiki Tiki Masks - 3 forty minute sessions
In our study, we viewed visuals of tiki sculptures and discussed a variety of Tiki gods. We identified the way the artists would exaggerate certain features of faces. (Be aware when cruising online images, there are some inappropriate ones)
I posted some visuals with a variety of facial features on the board for inspiration and from there the students started.
Day 1: I gave each student a sheet of 11 x 14" posterboard (although you can use any other material you prefer) and a pencil. Students were first asked to shape the top, bottom, and sides of their mask. They could round it or keep the edges straight.  Then cut out the shape you have drawn.
tiki2 tiki3 tiki1
Then students had the task of designing eyes, nose, mouth, and design details. Having visual examples to look at were very helpful. We noted that many of the tiki featured large open mouths with teeth.
Face details
Face details
This was a stopping point for us. After design was complete with pencil, we saved for the next session. 
Day 2:  I set out liquid tempera paint for the second session. Students were given the three primary colors RED, YELLOW, and BLUE.  They were also given white and black. I emphasized with students the importance of painting the lightest colors first then ending with the darkest as to keep the colors as pure as possible. Black was for fine detail and outlining work. 
tiki5
When these were dry, I got out my crafty Xacto knife and cut out the numerous eye holes that called for removal. If students left a gap between the teeth of the jaw lines I removed that too. 
Day 3: This day is optional if you feel like the second day gave the masks a level of completeness. I decided to give students one more day to collage scrap paper elements for a more refined work. I gave them paper left over from matisse collages. I emphasized the importance of SYMMETRY at this point and requested they keep that in mind when adding their paper elements. 
37994164
I created this art work by cutting out cardboard and painting.
37994473
'Lil Tiki.
37994798If students finished early, I let them create a Tiki Sculpture using a toilet paper tube and a 4 x 6" piece of white paper. Some of them turned out quite funny! Keep an eye out for a post on t.p. tube sculptures. 
37995102 38022254
A few pointers on this project: 
1. I'm not sure what it is about black paint, but they will go OVERBOARD with it. I give them specific instructions that it is a detail color and give them an especially tiny brush for painting with. Paint black last... it will alter all the other colors otherwise.
2. I don't think the white paint was necessary for us. Our poster board was already white so I think the paint really gave them more grief than helped. 
3. I wanted to emphasize primary colors on this project, however this could be much more colorful. This could be a value study with shades and tints of browns much like the carved tiki sculptures. Lots of options here.

Monday, June 8, 2015

Irrational Fears: Chalk Pastels

I have experienced an irrational fear of chalk pastels. They are dusty. Children end up with all sorts of odd colors in their noses, mouths, ears, etc. Messy messy messy. Plus, I never used them before myself in my many years of art classes in public school or college. It was a foreign object to me.
However, I put on some big girl undies this school year and gave them a try. Chalk pastels won a student of mine a first place award in a system-wide competition and I was converted.
sunset5
My students created an Native American Sunset Silhouette this year. This project was done by first graders, but could definitely work for any age upwards. 
We first watched the story The Legend of the Indian Paintbrush by Tommie DePaola. [embed]https://www.youtube.com/watch?v=gyaifWkUWr0[/embed]
I asked my students questions that centered around colors they saw in the sky from the story. Then we went to work on our own sunset compositions.
Native American Sunset Silhouettes - 2 forty minute classes
Day 1: I placed a selection of chalk pastels (broken in half) into a dish in the middle of the table. I chose yellow, orange, pink, red, purple, and blues. Each student was to select 1 yellow, 1 orange, then choose either pink or red, then choose blue or purple as their darkest color. (You don't have to give them a choice, but my students like to have one)
I then showed students the steps to create a gradient.
I found this demo on the The Art of Education site and this is what inspired this project. 
[embed]https://www.youtube.com/watch?v=oxbGTDawzms[/embed]
Then I sprayed them with hair spray after students left for the day.
sunset1

Day 2: We talked about silhouettes this day. We viewed silhouette visuals... showing both people and landscapes. We also talked about shadows and how we can see them easier when the sun is positioned just right.
I gave students a black piece of paper the length of the gradient paper. They could keep it straight or change it depending on how they wanted the ground to look. This was their horizon line.
sunset6
Then we reflected on the story we heard the week before. What kinds of objects would you find in the setting of that story?
Students drew with pencil onto black paper, then cut out and glued to their objects of choice onto their horizon line. 
sunset4sunset3
Many trees, bushes, and tee pees made their way into our landscapes. There were even a few horses and dogs. With the tiny students,  I found giving them a horizon line to work off of was easiest. Older students could probably create a silhouette where the black paper is all one piece. 
sunset2
In all, the chalk pastels were still kind of messy. I experienced a rainbow every time I blew my nose. There was a chalk trail exiting my classroom door. However, I found that the brief mess was worth the results. I love chalk pastels now! Yahoo!

Wednesday, June 3, 2015

Class Up that Trashcan!

Our schools have a surplus of boring storage. Green is great and all... but blah!
A co-worker of mine had the brilliant idea of making our rather boring wheeled fellows look a bit more exciting. I was given free reign and no money. So my solution was to buy up some cheep acrylic paints at Hobby Lobby and round up some capable 4th and 5th graders.

The goal was to cover as much of the can as possible and emphasizing that this was a RECYCLE bin. Not for trash, please!
trashcan4 trashcan3
Our first set of cans was inspired by Keith Haring. It began as a light spray paint base. Then we painted body figures in a variety of poses around the can. Our goal was graffiti. I think this fit the bill.

trashcan6 trashcan5
Our second can was Van Gogh Starry Night inspired. This was all cheap acrylic paint you can get from any craft store. The key to this can was making sure it consisted of many lines much like the style of Van Gogh. 

trashcan22trashcan1
Our last can was my favorite. We were inspired by Wassily Kandinsky. I think this can turned out most successfully because we were able to completely cover ALL of the original can color. The wheels even got a color treatment. 
Each of these cans has been placed in a hallway for our white paper recycling program. Wouldn't it be fun to see one out on your curb on pick up day?

Monday, June 1, 2015

Color-full Bird Masks

I've found Artsonia to be my new favorite go-to site when at work. It has a plethora of ideas right at your finger tips. I started using it for inspiration then eventually began our own school gallery. It has been a real treat to utilize a more worldly venue that allows family from any corner of the globe to view a child's art work. This particular project was inspired from a mask I saw on Artsonia.

birdmask3


Thursday, May 28, 2015

End of the Year Shenanigans

This end of the school year dragged until the last week where things flew by in a flash. The last couple of weeks I try to put away a lot of supplies for the summer, so the challenge becomes… what can we do that will minimize the supplies I need out?
At my primary school my all time favorite activity is Circle Paintings. I got this idea from the blog Deep Space Sparkle. I found its a great way to get my students to collaborate and work together.

circles2circles3


Keep Calm...

Keep calm.. but I might start blogging again. 
I took a hiatus for a variety of reasons. Getting married was a major distraction and the fact that blogging became more of a chore rather than fun. 
I just finished my 11th year teaching and I could not be more excited to start my summer. This seems like the ideal time to give it another go. Hopefully I can get back into the swing again and share some of the exciting stuff we like to create in my art room.

With a fresh start I decided to change the name of the blog. Welcome to Keep Calm and Crayon! 
I think it'll be catchy!

You can also find me on wordpress: Keep Calm and Crayon Wordpress

display1

Wednesday, December 5, 2012

Holiday Primary Works

The past few weeks we have been gearing up for the holidays at the primary school. I'm a fan of reindeer so I'm exploring two different approaches this year.

My second graders created a Reindeer landscape. This project also explores a variety of textures. I posted about this project previously here: http://amanda0480.blogspot.com/2011/11/textured-reindeer-landscapes-favorite.html


This year, however, I used shredded paper for the snow on the ground. Someone donated it to the art room and I found great use for it. I love donations!


My first graders made Reindeer Portaits! I found this project somewhere on pinterest and I just did my own version on 9 x 12" blue construction paper and we use geometric shapes to help create the portrait. This project took 2 forty minute classes to complete. It is made entirely from construction paper. Colors needed:  Red, white, black, brown, and green


Next time I think I might like to allow students to stamp snowflakes onto the background for a little extra fun.


Lastly, my kindergarten students made a portrait as well. We read the book "Russell the Sheep" by Rob Scotton. We looked at Russell's hat and made note of its pattern.  The first week students printed a pattern onto a piece of 6 x 9" white paper. We stamped with unsharpened pencils and pieces of cardboard to create dotted and straight lines.


The second week we cut the patterned paper into a large triangle.
(Student pattern work)


We drew a large rainbow on a small piece of white paper for his face. I already had squares pre-cut for the neck and curved shapes for the ears.
Students cut, assembled, and glued their shapes onto 9 x 12" blue construction paper.
We glued piece of cotton ball for the top of the hat.
Lastly, we painted snowflakes around Russell using eraser ends of a pencil.
This took 2 forty minute classes to complete.


Tuesday, November 13, 2012

Stacking Donuts

I've been really interested in exploring "food" themed art as of late. I have created hamburger collages with my students before, however I thought I'd give something new a try.  With my first graders I discussed Wayne Thiebaud and we created Stacking Donuts.

The vocabulary we learned about on this project were overlapping, realistic, texture, collage, and painting techniques.

 
We began by viewing visuals of Thiebaud's work from google images. We also looked at images from Dunkin Donuts. Then the first week students drew 5 or 6 circles on manila paper. Drew a hole in each circle. Traced with a black marker. Then colored the donuts with a brown crayon by rubbing. We rubbed with brown crayon to "cook" the donuts and even discussed the assembly line process that takes place at Krispy Kreme.
 

The second week we discussed glazes and icing. I had each table set up with one color of paint and a painting tool (brush or sponge brush). Students painted a donut then rotated to a new table and new color. Btw: spongebrushes with white paint made for excellent powdered donuts.

The third week we cut out our donuts and glued them to fill a tall 6 x 18" white paper. We could overlap some parts of the donuts. Then students rotated to different tables again for varying toppings. For example:  Yarn for icing, shredded white paper for coconut, chopped brown paper for nuts, hole-punched colors for sprinkles, etc

Hopefully I can post some finished products soon.

On another note: I learned from another art teacher about a nifty little paint tray = styrofoam egg cartons. Easy, holds well, and great way to recycle. If you notice the empty side is great to rest brushes on. I covered  with paper the parts of the tray that I didn't want paint in to keep them clean for other colors later.

 
This project took 3 forty minute sessions and each one was lots o' fun!

Pattern Tee Pees

Its been rather hectic in the world of the art room the last few weeks. To update I'm going to share a few lessons that we have been working on.

First, my kindergarteners have spent the last two weeks working on Pattern Tee Pees. These are turning out sooo well!

We began by viewing examples of Native American costumes, historical black and white photos, and tee pees. Then we discussed patterns and how we could find them on many tee pee examples.

(Student examples of their patterns)
 
I pre-cut paper bags from the grocery store down into quarters. It don't have example measurements, but you can use most any size you feel most comfortable with.  Then I had students draw lines across their paper to create patterns. We said the lines out loud as we drew.
 
(Table set up for drawing then painting)
 
Students then painted all the same type of lines 1 color, then rotated to a second table to paint their next type of line. We continued that so on and so forth to paint all the lines in our pattern.
 
 
The second week when the patterns were dry, students cut out a large triangle from the painted pattern paper. (This could be predrawn from a template on the back if needed).
We cut a door from black construction paper, then used brown construction paper rectangles glued to the top for the support poles.
 
This took 2 forty minute classes.
Materials:
1. Brown paper bags (pre cut)
2. Tempera paint in varying colors
3. Brown crayons
4. Scissors
5. Glue
6. Black and brown construction paper


Tuesday, October 16, 2012

Silly Pumpkins are too fun!


I have seen these pumpkins before online from various locations. I thought they looked so fun I gave them a whirl with my kindergarteners this year.


We spent 2 weeks on this project.  The first week we read a book about the life cycle of a pumpkin. There is an assortment of books out there on the subject so most any one would do. Then students painted a 9 x 12" piece of white paper with orange and yellow tempera paint. We left them to dry.

(Front and back of paper)

The second week I pre-drew an oval on the back of each student's paper.
I also set up the tables with small pieces of white and black paper (2 x 2 inches), a 4 1/2 x 6 inch piece of black paper, and one small green piece of paper.

(Table set up. Pink box has pencils, red tray contains paper)


We began by cutting out our ovals. Students had to decide whether they wanted a tall pumpkin or a short and wide pumpkin.

Then we drew a rainbow across our 4 1/2 x 6 piece of black paper. We cut it out to create the mouth. Glue to the bottom of the orange oval.

Next, draw a very large circle or oval on two pieces of white paper.  Cut out and glue above the mouth for eyes.

Next draw a circle on two pieces of small black paper (2 x 2") for the pupils. Cut and glue onto the white paper.

Glue on a green stem.


Then lastly, I used white paper scrap from another project for teeth. These were pre-cut white squares.


These turned out remarkably cute and everyone was successful!  I will certainly do this project again!